
HandyComfy connects to the ComfyUI instance running on your own computer or server. HandyComfy provides the mobile controls; the connected ComfyUI system performs workflow execution and generation.
Before you begin
You need a working ComfyUI installation and a network path between your mobile device and the computer running ComfyUI.
ComfyUI must accept network connections. Start it with the --listen option. For a standard Python installation, the command is:
python main.py --listenYour launch method may differ depending on how you installed ComfyUI. The important requirement is that --listen is enabled.
Add your ComfyUI server
In HandyComfy, open:
Settings→Server Management→ComfyUI
This screen contains your saved ComfyUI servers.
- Select Add ComfyUI Server.
- Enter a Server Name. This is a label that helps you identify the server, such as
Home PCorStudio PC. - Enter the Server Address for the running ComfyUI instance.
- Save the server entry.
For a typical local connection, the address has this form:
http://<ComfyUI-PC-IP>:8188For example:
http://192.168.0.10:8188The example address will not work for everyone. Replace 192.168.0.10 with the actual address of your ComfyUI computer.
Server Management · add server
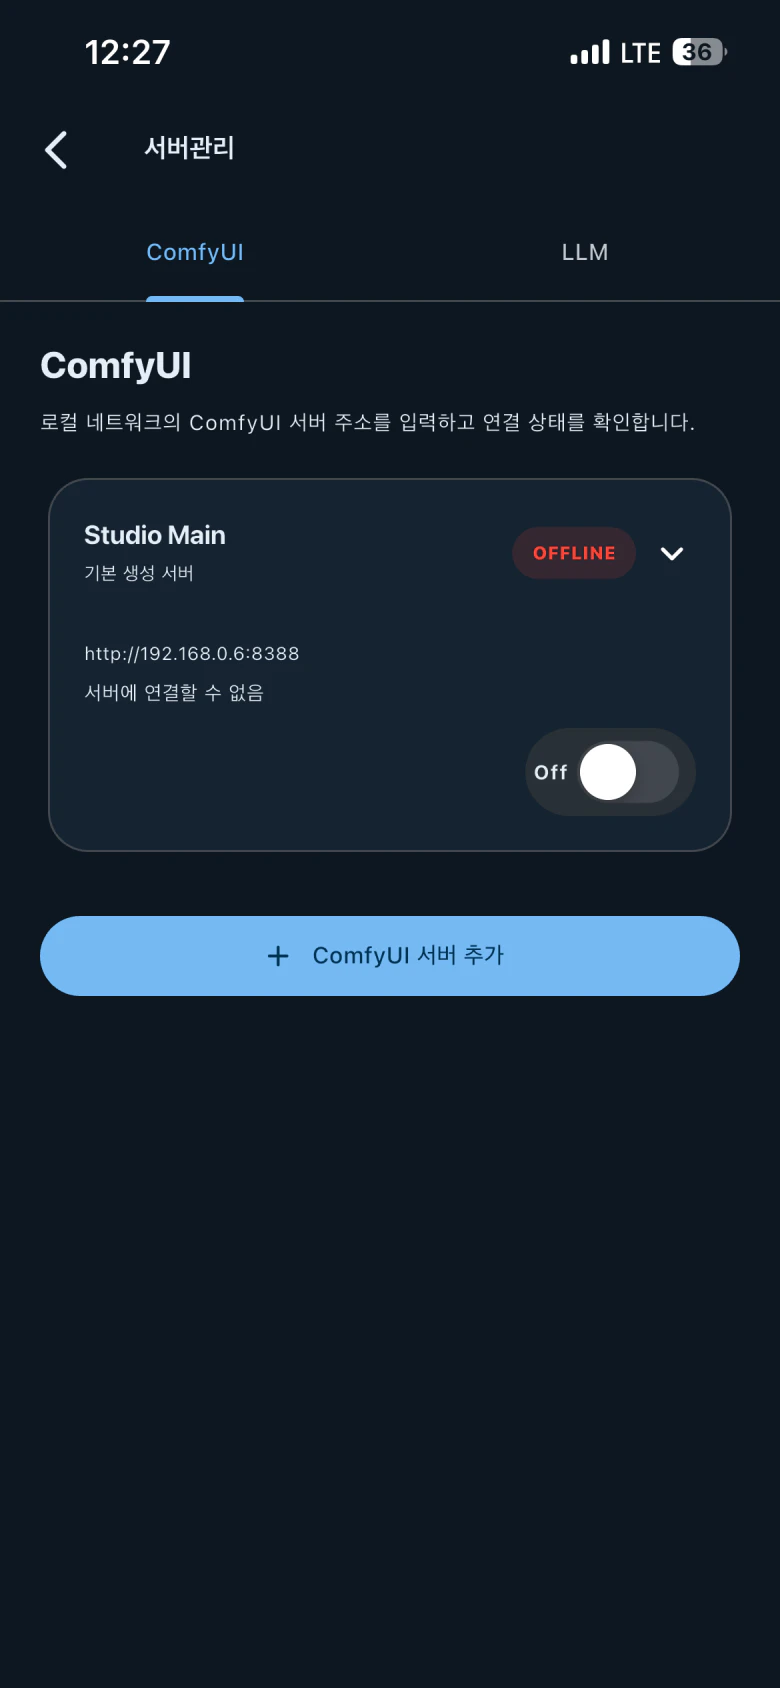
Server entry · name and address
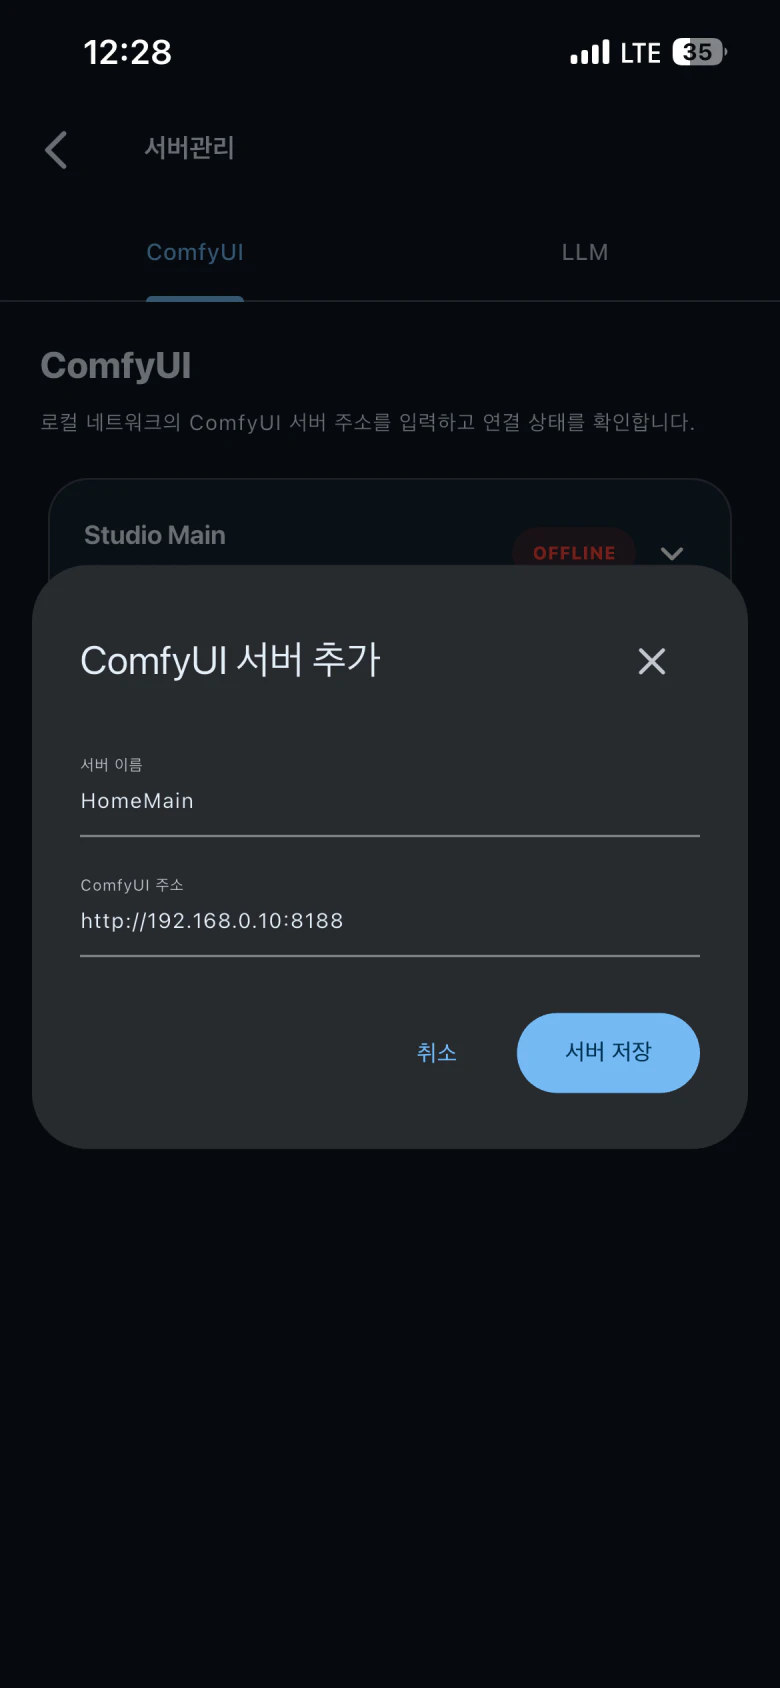
Test the connection
After the server is registered, open its details and select Test Connection. Test before trying to run a workflow.
If the test fails, first confirm that:
- ComfyUI is running.
- ComfyUI was started with
--listen. - the server address is correct.
- the phone can reach the ComfyUI computer through the current network.
Registered server · connection test
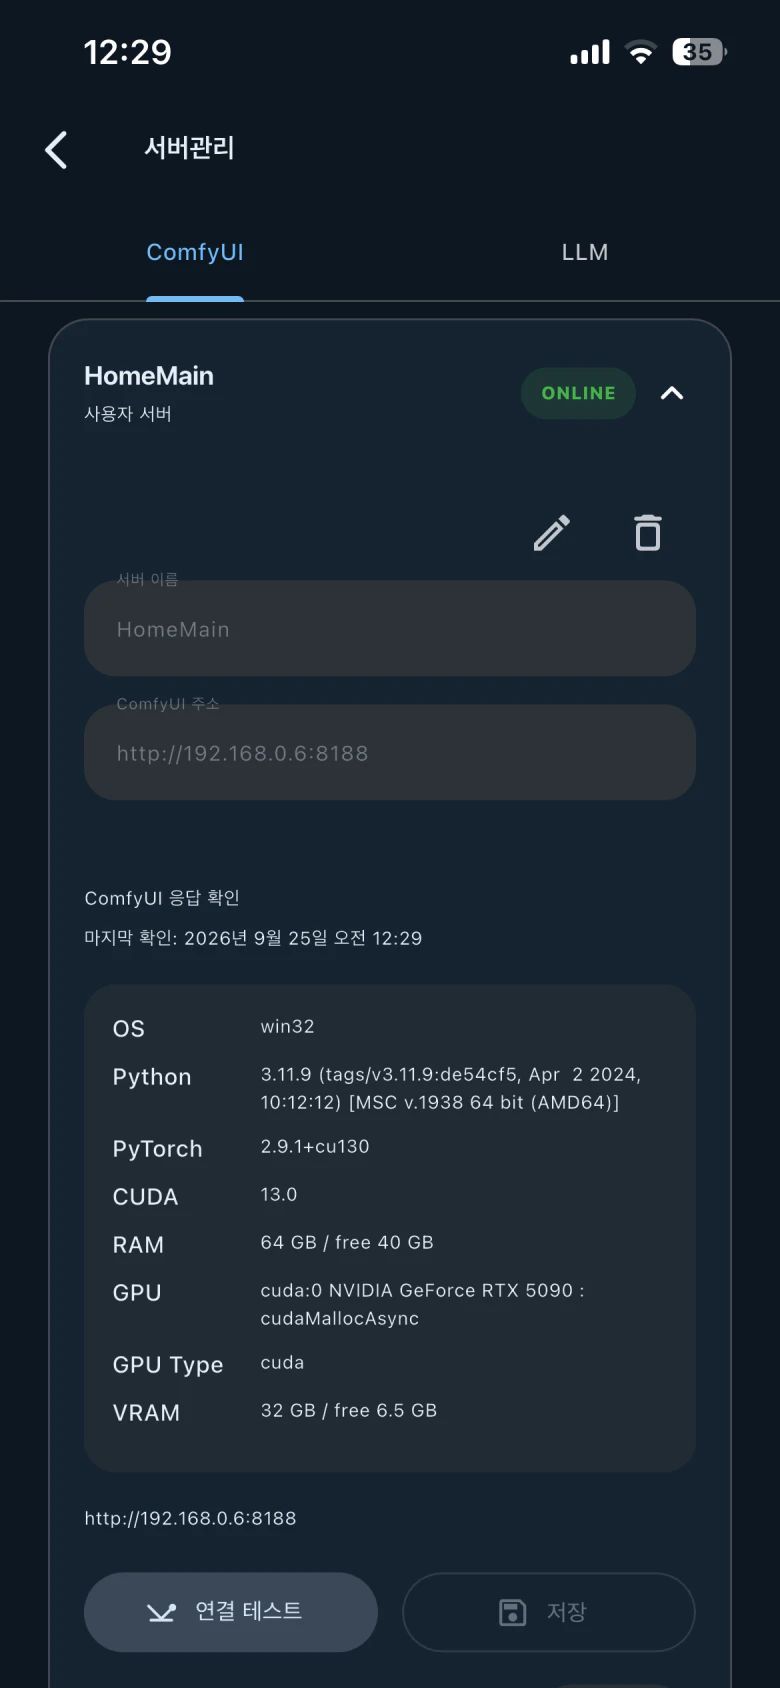
Confirm you are connected
Use both of these checks:
- In Settings → Server Management → ComfyUI, confirm that the registered server reports a connected state.
- In the bottom system status bar, confirm that the traffic-light indicator beside ComfyUI is green.
The green bottom indicator is the main success checkpoint: HandyComfy is connected to the selected ComfyUI server.
Manage multiple servers
HandyComfy can save more than one ComfyUI server. You do not need to delete an existing entry before adding another.
Each saved server has an On/Off toggle in Server Management:
- On enables that server for use.
- Off keeps the saved entry disabled.
Use only the toggles to enable or disable saved servers. No additional toggle behavior is assumed by this guide.
Server Management · multiple servers
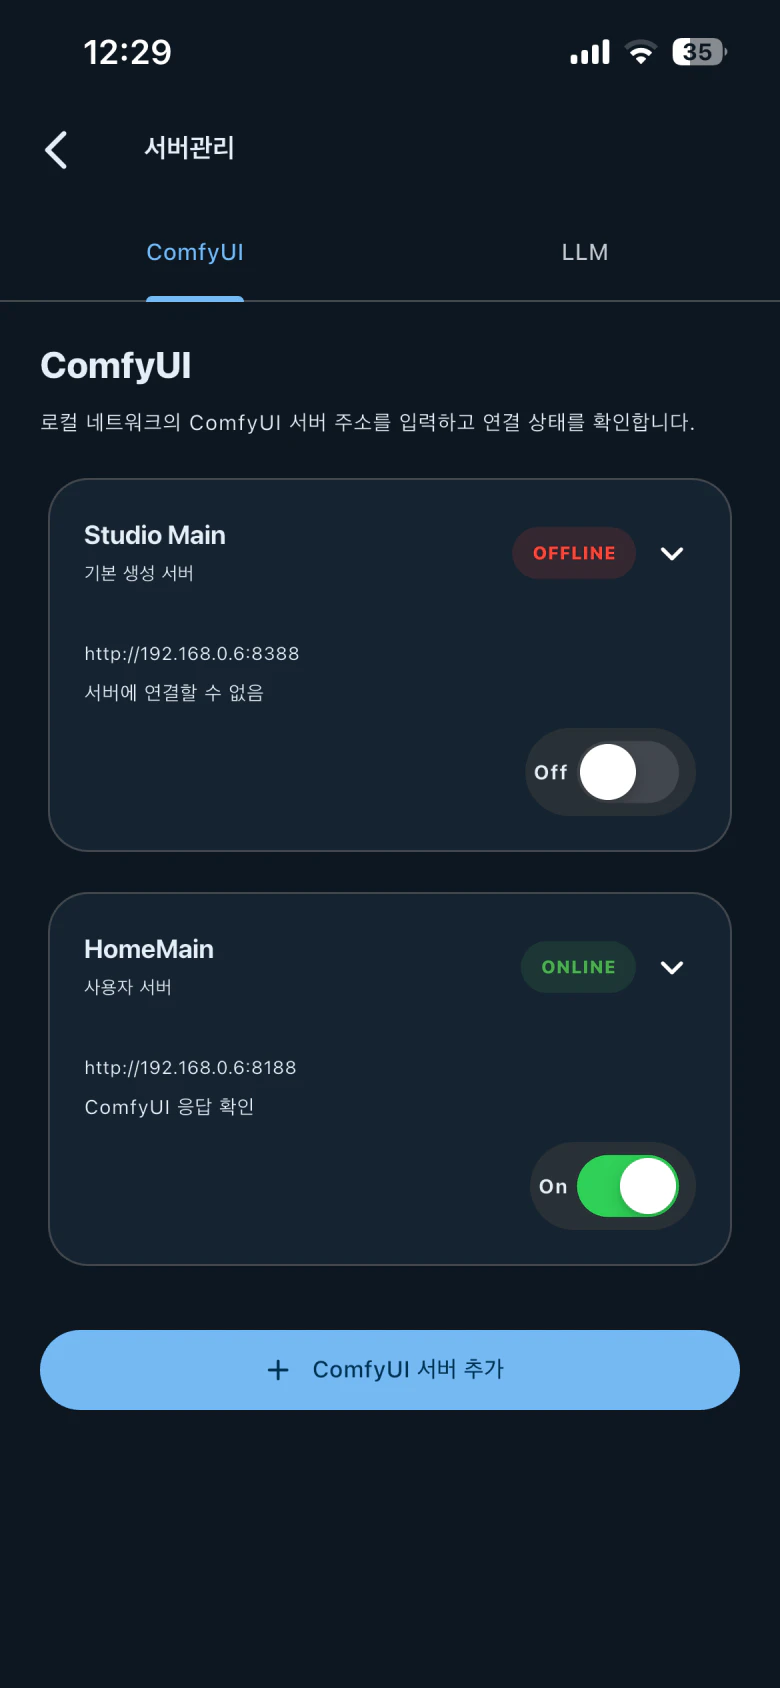
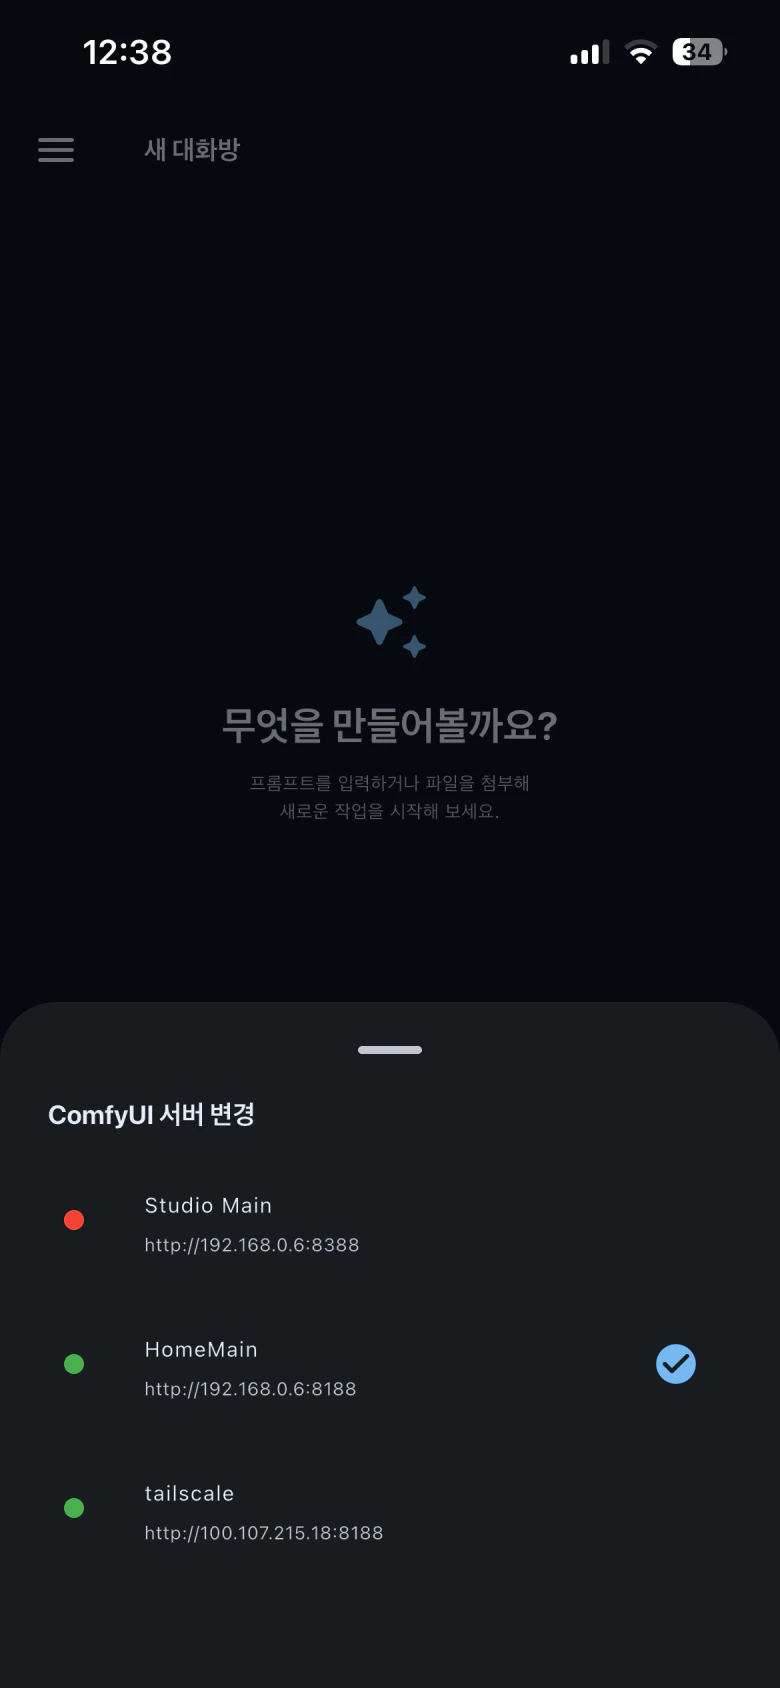
Switch servers quickly
When the servers are already configured, you can switch without opening the full Settings path:
- Long-press the ComfyUI traffic-light indicator in the bottom system status bar.
- In the server selector, choose another saved ComfyUI server.
- Confirm that the selected server shows the expected connection state.
Use full Server Management when you need to add, test, or enable a server. Use the quick selector only to switch among servers you have already configured.
Quick switch · long-press

Quick switch · server selector
Connect on your local network
Use a local connection when the HandyComfy device and ComfyUI computer are on the same network or Wi-Fi.
- Start ComfyUI with
--listen. - Find the local IP address of the ComfyUI computer.
- Add a server in Settings → Server Management → ComfyUI.
- Use a local address such as
http://192.168.0.10:8188, replacing the example IP with your own. - Save the entry and use Test Connection.
- Confirm the registered server is connected and the bottom ComfyUI indicator is green.
Do not use localhost as the server address in HandyComfy. On a phone or tablet, localhost refers to the mobile device itself—not the computer running ComfyUI.
Connect remotely with Tailscale
Tailscale is the recommended remote-access method for this documentation. It creates a private network path between your HandyComfy device and the ComfyUI computer.
ComfyUI must still run with --listen. Tailscale supplies the network path; it does not change that ComfyUI requirement.
To connect:
- Install and enable Tailscale on the ComfyUI computer.
- Install and enable Tailscale on the mobile device running HandyComfy.
- Connect both devices to the same Tailscale network.
- In HandyComfy, add a new ComfyUI server.
- Enter a useful name, such as
Home PC - Tailscale. - Use the address through which the ComfyUI computer is reachable over Tailscale:
http://<Tailscale-address>:8188- Save the entry and select Test Connection.
- Confirm that the server connects and the bottom ComfyUI indicator becomes green.
The exact Tailscale address varies. This page does not invent Tailscale installation screens or HandyComfy-specific Tailscale settings that are not present in the product source.
Keep local and remote entries
You may save both connection paths as separate servers:
| Server Name | Server Address | Use |
|---|---|---|
Home PC - Local |
http://192.168.0.10:8188 |
On the same local network |
Home PC - Tailscale |
http://<Tailscale-address>:8188 |
Away from the local network |
This dual-profile setup is optional. Use the quick server selector when you want to move between configured local and Tailscale entries.
Having trouble?
If Test Connection fails, a registered server does not connect, or the bottom ComfyUI indicator does not become green, review these basics:
- Confirm that ComfyUI is running with
--listen. - Check the complete server address, including
http://and port8188where applicable. - Confirm that the phone can reach the computer through the chosen local or Tailscale network.
- Retest the registered server in Server Management.
If the connection still does not succeed, confirm that ComfyUI is listening on the intended network address and that both devices can reach each other through the selected local or Tailscale network.