
HandyComfy can add LoRA models at the app level, even when the original ComfyUI workflow does not contain a Load LoRA node. This gives you reusable LoRA controls without requiring another graph edit for every combination.
Available LoRAs still come from your connected ComfyUI server. HandyComfy does not install or host the model files.
Add a LoRA
- Open the workflow in the Workflow tab or from Workflow Management.
- Select LoRA under Workflow Settings.
- Select the add button.
- Search for and choose a LoRA available on the active ComfyUI server.
- Adjust Strength if needed.
HandyComfy inserts an app-generated Load LoRA node after the workflow node mapped as Model_DiffusionModel.
Workflow Settings · LoRA
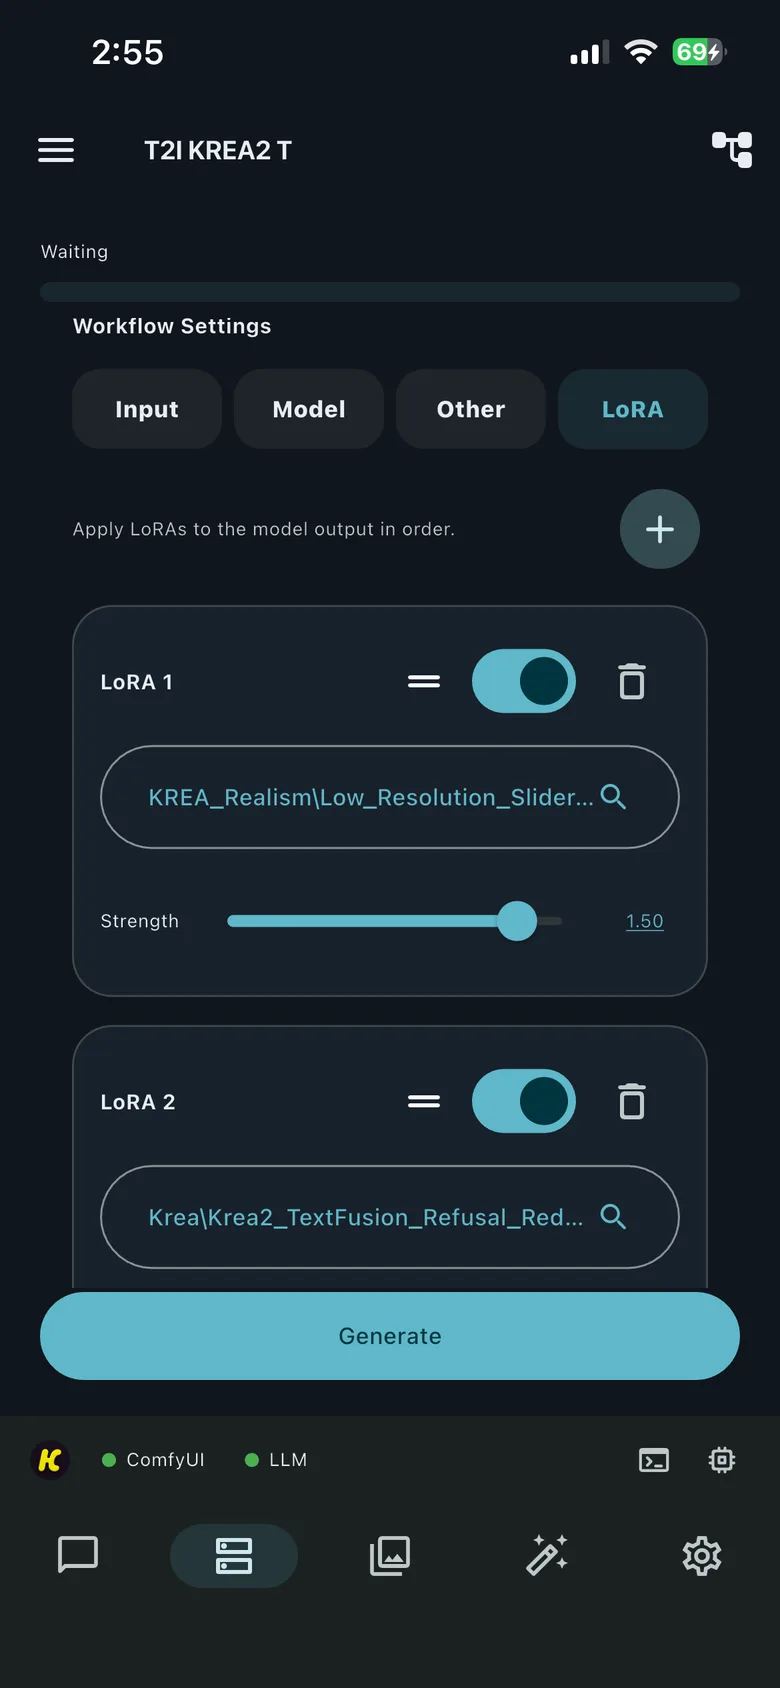
Set Strength
The default Strength is 1.0. You can use the slider or tap the numeric value to enter a Strength directly.
Strength supports negative and positive values with up to two decimal places. The exact accepted minimum and maximum are not documented, so use the range offered by the current app control.
Choosing an appropriate value depends on the LoRA and the result you want. HandyComfy does not determine the best Strength automatically.
Add and organize multiple LoRAs
You can add multiple app-level LoRAs. HandyComfy currently does not impose a configured entry limit.
Use the drag handles to place frequently changed entries where they are easiest to reach. The display order is also the order in which HandyComfy connects the generated Load LoRA nodes.
Reordering is intended as an organization tool, not as a generation-tuning control. You generally do not need to change the order to alter the result.
Disable or remove an entry
Use the control on each LoRA entry according to what you want to preserve:
| Action | Result |
|---|---|
| Turn On | Include the LoRA when the workflow runs. |
| Turn Off | Exclude the LoRA from execution but retain its model, Strength, and position. |
| Delete | Remove the entry and its saved settings from this workflow configuration. |
Turn an entry Off when you expect to use it again. Delete it when you no longer want to keep its configuration.
Use app-level and workflow LoRAs together
You can add app-level LoRAs even if the imported graph already contains Load LoRA nodes.
HandyComfy inserts its generated nodes immediately after the mapped Diffusion Model output. Existing downstream LoRA nodes then follow those app-generated nodes in the execution graph.
This does not require you to remove the workflow’s existing LoRA nodes. The LoRA tab manages only the additional app-level entries.
How HandyComfy remembers LoRAs
HandyComfy stores each entry’s:
- selected LoRA model
- display order
- On/Off state
- Strength
These settings remain after you restart the app and are shared by the Workflow tab and Chat for that workflow.
Like model selections, LoRA settings are remembered separately for each Workspace Profile and ComfyUI server. When you return to a previously configured server, HandyComfy restores that server’s LoRA list and settings.
Refresh newly installed LoRAs
New LoRA files installed in ComfyUI normally appear in HandyComfy automatically. If one is not listed:
- Run the ComfyUI server connection test, or tap the ComfyUI connection indicator in the bottom status bar.
- Open the LoRA search again.
- If the LoRA still does not appear, restart HandyComfy to force the server list to load again.
Confirm that you refreshed the same server on which the LoRA file was installed.
Resolve a missing LoRA
Before generation, HandyComfy verifies that enabled app-level LoRA selections exist on the active server.
If a LoRA is missing, HandyComfy blocks execution and lists the unavailable entry in Workflow cannot run. The same dialog can report missing workflow models and multiple missing LoRAs together.
Pre-run validation · missing LoRAs
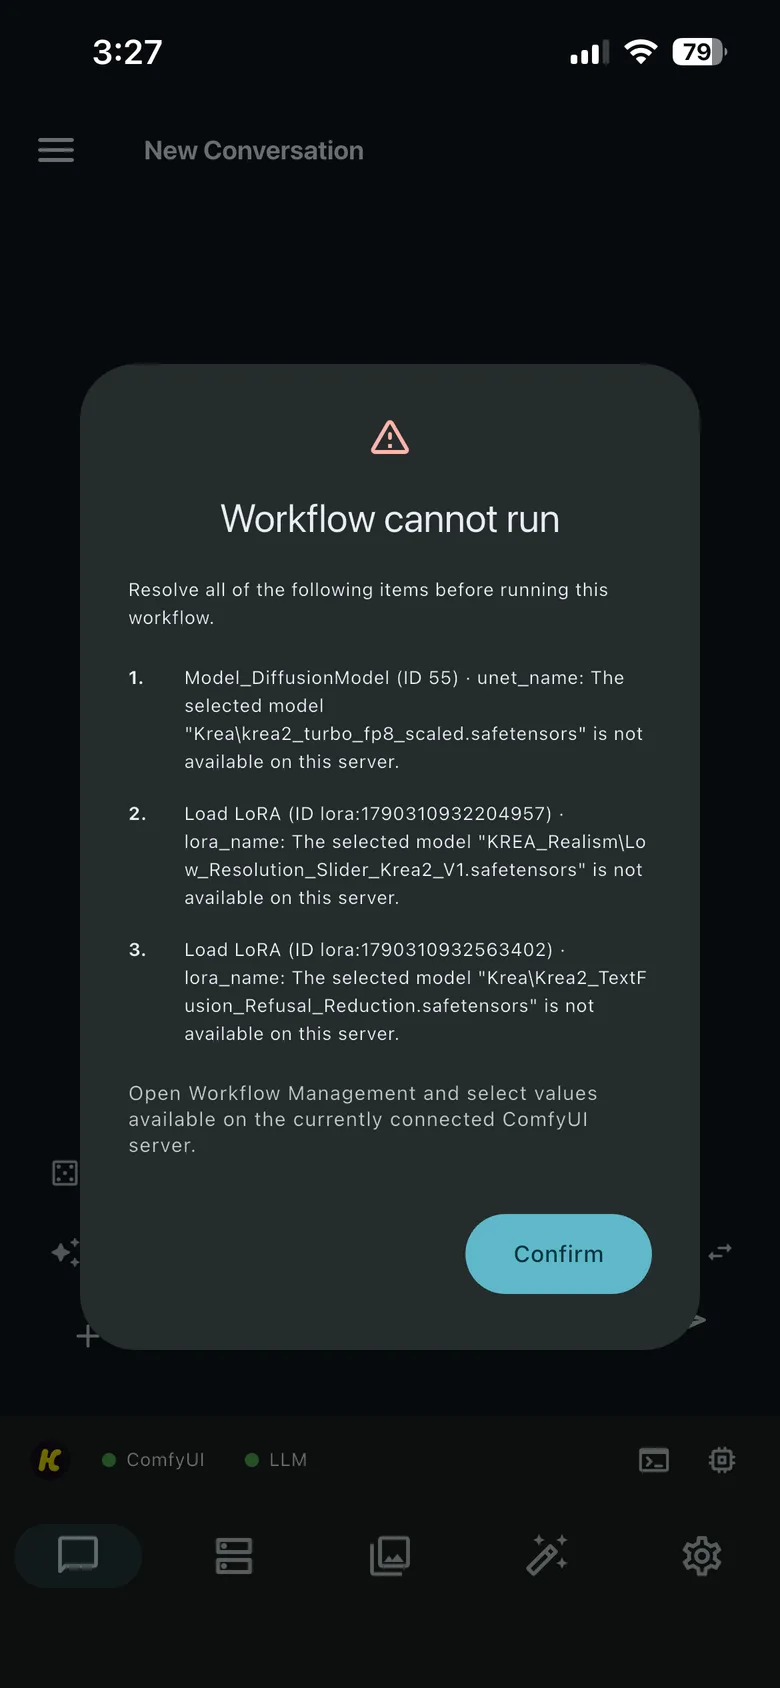
To continue, open the workflow’s LoRA tab and do one of the following for every missing entry:
- select a LoRA available on the active server
- turn the entry Off
- delete the entry
Check compatibility and trigger words
HandyComfy confirms that a LoRA file exists on the server. It does not verify that the LoRA is compatible with the selected Diffusion Model.
Choose a LoRA designed for the workflow’s model architecture. An available but incompatible LoRA may still produce an execution error or an unintended result.
HandyComfy also does not display or insert LoRA trigger words. If a LoRA requires them, add those words to the Prompt yourself.